Sunday, October 23, 2011

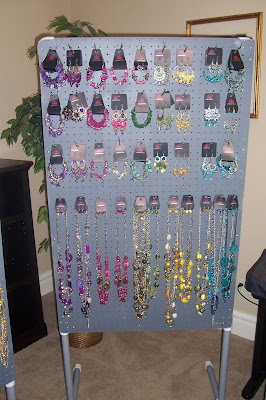
My Upline's Displays

This is my upline's displays.  When she travels, she keeps the jewelry on her board using carpet pad and bungee cords.  You can also use string, ribbon, saran wrap and more!

She sets up a table and sits down with a money box to check-out people.  I don't sit!  I walk around and talk to people, but I do have a table where I check people out and have them fill out the entry for a drawing which includes their name, number and if they are interested in hosting a party or becoming a consultant.  I have booked many parties from those little papers.  I also tell them when they host a party, they usually get anywhere from 6-12 pieces of free jewelry.


Below are some pictures of how she displays her things.


I really like the grey background on her boards!

She sells quite a few bracelets and earrings and I think it is because of the way she displays them at eye level.  The customer can see them easily when picking out a necklace.  Great upselling technique.

Monday, October 17, 2011

Clip Display

 This is how I display my clips.  It holds about 45-48 clips when they are packed closely together.   Extra clips I have that don't fit, I just put around the tables and out where people can see them.   Usually the clips that have 2 small ones, I keep on a card and put near the starlight shimmer items.  BTW, you need to check out and buy some starlight shimmer rings and earrings if you haven't already.  I charge $1.25 per item and they sell VERY WELL. 


To make my display, I just bought an old frame from a garage sale ($.25!!!!)   I spray painted it white and then stapled ribbon from one side to the other in rows.   It took me about 20 minutes total (not including drying time).   The clip display is easy to transport, quick to set up (just lay it on a table) and cute!   I get many compliments about it at parties and people say they are going to go home and make one for their clips!
This is the back of the display. 

I display a clip on a bag.  You can also display a clip on a hat, shoes, necklace, shirt, jacket, sweater, etc.  Showing or explaining how clips can be worn are great for upselling.  At my very first party, I wore a clip on a necklace.   The first customer bought 6 items.  Then she talked to my mom (the host) for a while.  After a few minutes, she said, "Is that a clip you are wearing on your necklace?"  I said, "Yes.  There are SO MANY things you can do with clips."  I proceeded to tell her all the places you can wear a clip.  She walked over the clips and bought 4 more:)  Nice!   I have used this technique many times and sold MANY clips by just talking about what you can do with clips.   ALWAYS wear a clip on a necklace (unless it looks really bad!  Then just wear it on your shirt!)

Happy clip selling:)

Sunday, October 16, 2011

Headband Display

This is my headband display! I love it! If you live close enough to us, my husband will make one for you for just the cost of materials. Or you can follow the lovely tutorial below and make one for yourself!

The materials


4" plastic pipe (I recommend spray painting it).

2x4's

1" piece of wood that are about 9 inches wide

Screws


We cut the pipe into 4 pieces that are 26" across.

The 2x4's are also cut into 4 pieces that are 26" across.

The sides are 1" thick, 9" wide and 25" tall.


First, we got a 4" plastic pipe and spray painted it black. I just use the el-cheapo spray paint from the home improvement store that costs about $1.

Silly me. I waited until it was dark to spray paint so I wore a head lamp and a t-shirt from when I ran for student govt. waaaaay back in high school. The head light worked well!


Measure where you want the 2x4's to go on the side boards and make the holes on both sides. Make sure they are the exact same on each side:) In case you are wondering, there is a 4" gap between the holes from one screw on a 2x4 to the next screw on the next 2x4.


Attach the 2x4's to one side of the sideboards using screws.


Put the pipe over the 2x4's.


Screw on the other side board and you are done! Just make sure you are leaving enough room in between each pipe to place headbands.


You can see it to the side of the display. It is easy to transport, very sturdy, takes up minimal space and looks nice. I usually have it turned towards the group. It looks similar to the one that Paparazzi is selling for $50 and only cost us about $10.
With 4 tiers, it holds about 50-60 headbands at one time! The picture at the very top is with 39 headbands, but I like to have more on than that. The headbands still can twist so the heavy part is at the bottom so the tighter I pack it, the better the headbands don't twist. You can always make one that has 1, 2 or 3 tiers if you don't want to have so many headbands.


If you want one, email me at jewelryforfive@gmail.com


Friday, October 14, 2011

Pegboard Carrying Display Case

Mandy from Sugar Bee also has a tutorial of how to build carrying cases for necklaces and jewelry. I like hers because the jewelry is inside and closed when being carried. Easy to transport, store and set up! It looks very classy too.

See the pegboard carrying case.

Wednesday, October 12, 2011

Arrow Sign

Mandy at Sugar Bee Crafts (a fellow Paparazzi consultant) has another great idea for a craft booth (and can be used for other things when not at a fair).   She made a chalkboard arrow sign and writes $5 jewelry on it.   Super cute idea!


Tuesday, October 11, 2011

Great Ideas At Sugar Bee

When I do parties and small fairs, I wear an apron and walk around instead of sitting at a table to collect money.  That way I can talk to the customers, try to upsell and answer questions.  Utility aprons are diffficult to find.  Sugar Bee has an easy tutorial on how to make one.  It should only take a few minutes.

Check out the utility apron tutorial.